Friday, April 30, 2010

Magnet Tutorial

Many of you already know how awesome hot glue is. But some people still need to be reminded how easy it is to make one's space better. So today, in pursuit of the better work space, I share with you (dum-dd-dum-dum!)

THE MAGNET TUTORIAL
I know, you've been waiting on pins and needles for this. Okay, well, I've been sitting on pins and needles because of this.... but that's another story for another day!

Step 1: Start with a sad little clip. I found my sad clip in the basement. (hmmmm.... maybe there is lots of sad stuff in my basement....I see a trend)
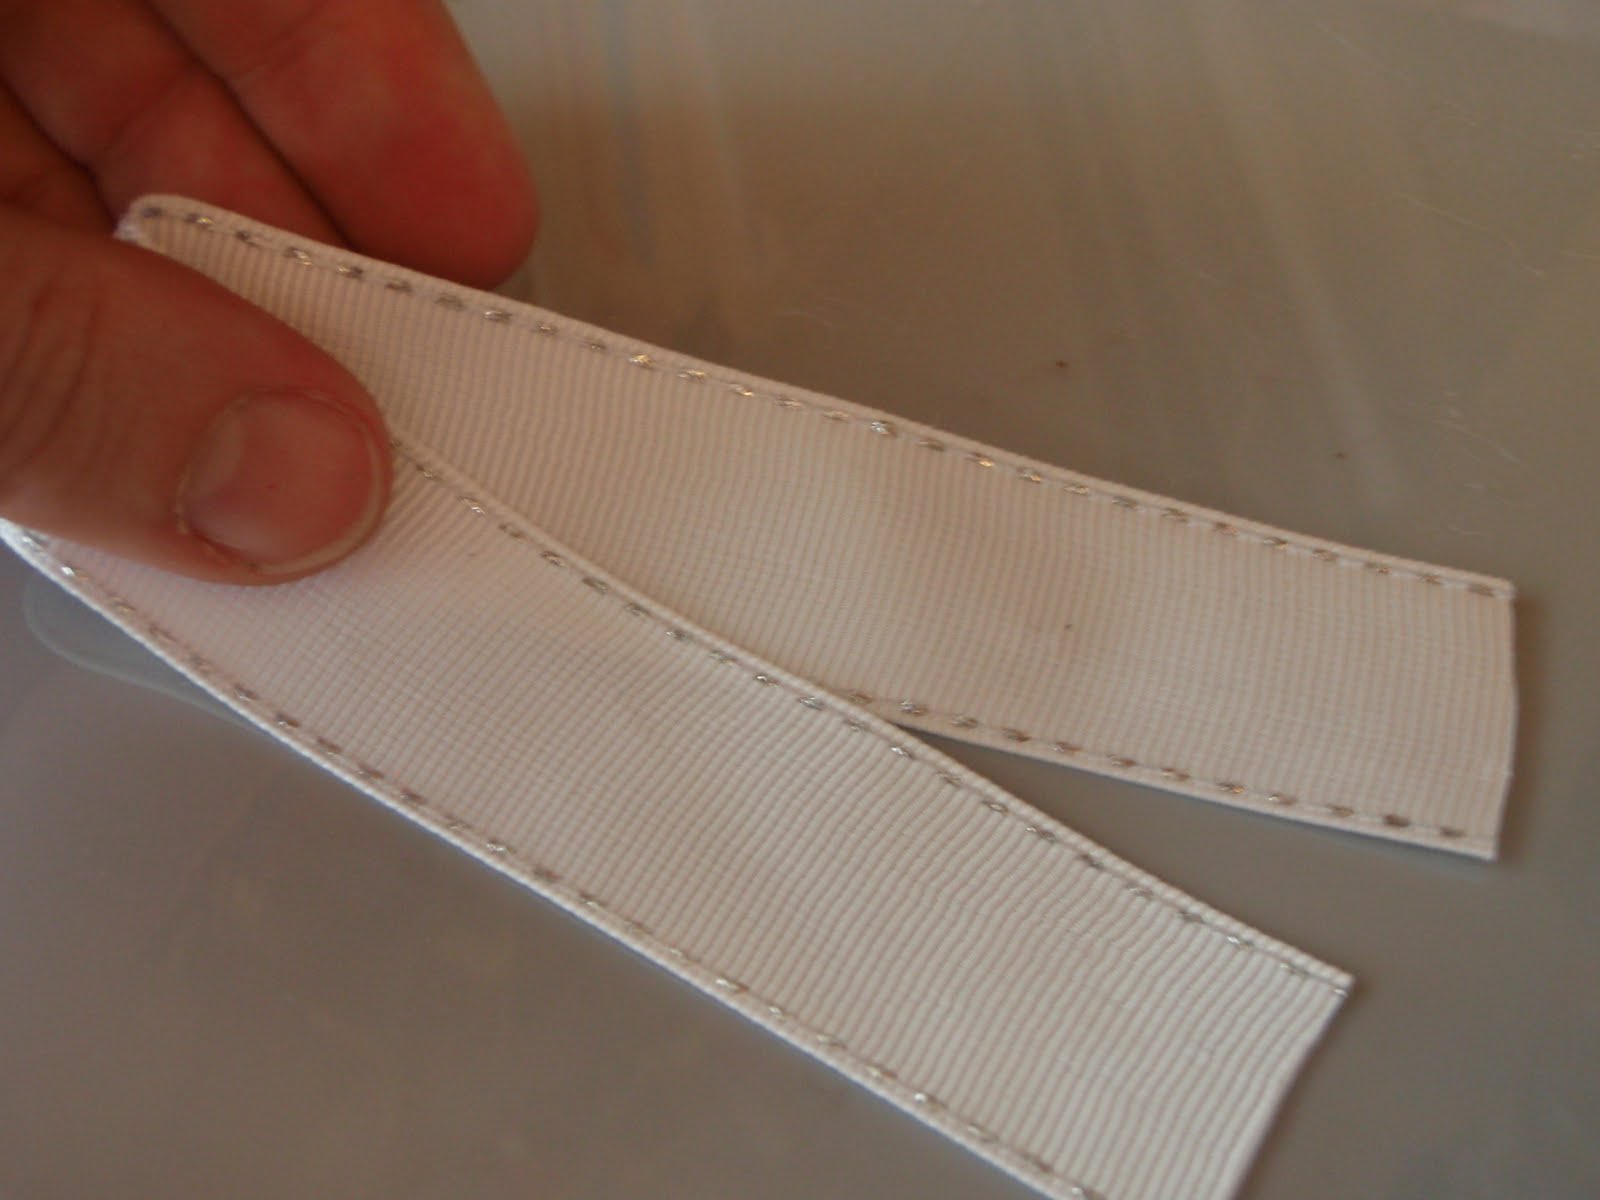
Step 2: Take a length of make-you-happy ribbon. Mine was 8 inches.
Step 3: Add the hot glue to the clip.

Step 4: Add the ribbon end to the hot glue.

Step 5: Fold the ribbon around and add the other end to the same blob of hot glue.

Step 6: Wait for it to cool.

Step 7: Add another blob of hot glue to the center and press 1/3 of your ribbon loop into it.

Step 8: Press your furthest 1/3 of the ribbon loop into the same blob, making three total loops.

Step 9: Wait for it to cool.

Step 10: Add a bit of glue inside the center loop and press the center loop into it. USE A PENCIL OR OTHER NON-MELTY DEVICE TO HOLD IT DOWN.... I capitalize that because hot glue burns. Don't ignore this advice unless you like to swear and hold your finger a lot.

Step 11: Wait for it to cool while applying pressure with the afor mentioned pencil or other non-melty devices.

Step 12: Add a bit of hot glue to the top of the center ribbon. Attach little things that make you happy. I used three little rocks that I tumbled a few years ago. They are pretty, but too small for so many other things. So they rescued my magnet. Not what you were expecting, huh? :)

Step 13: Attach magnet to magnetic surface and enjoy having one of your random notes off of your desk!! :)

You can even turn other things into magnets.


Old Earrings :)
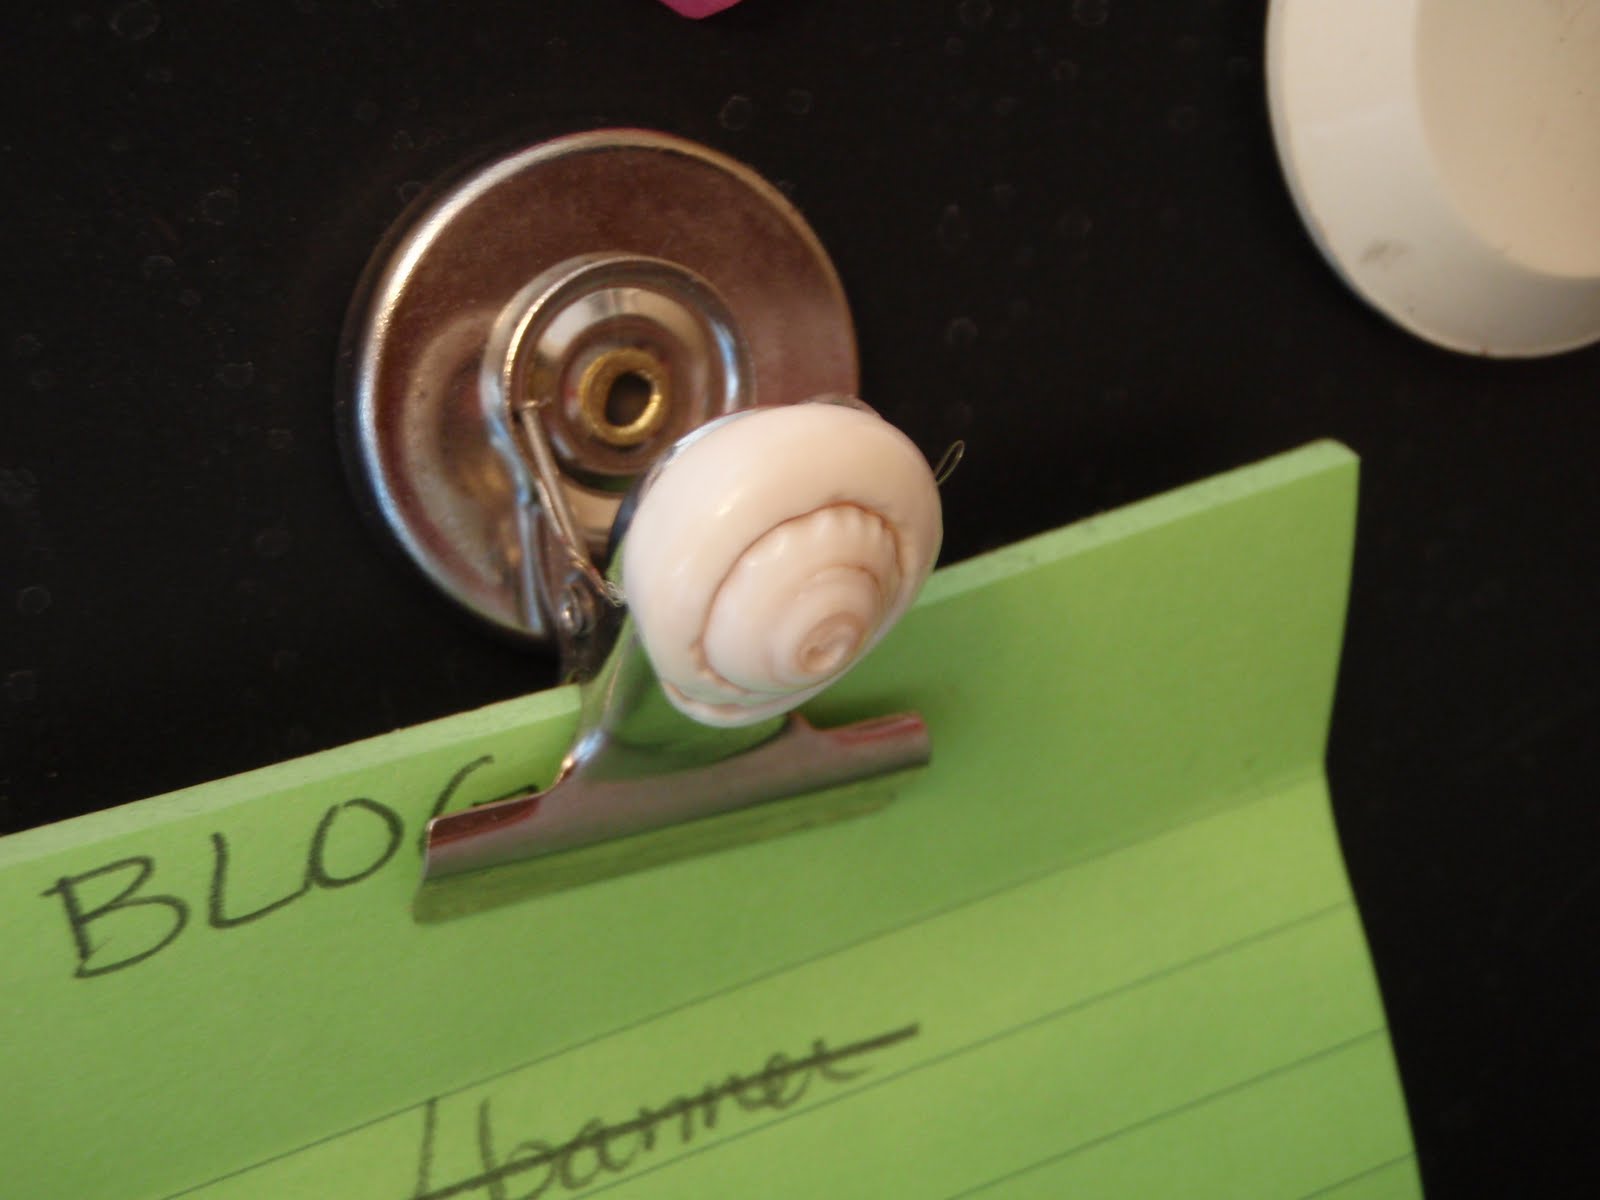
Seashells! Poker Chips!

My favorite little budda!

Even your tools! Now I'll always be able to find ONE of my many tape measures! :)
Now go GLUE SOMETHING!!! :)

Thursday, April 29, 2010

Dinner Plans Tutorial

Are you tired of the "What's for Dinner?" My twins can't even talk enough to ask this yet, but I'm already over it. So I decided to do something about it. And the solution was this little, sad index card box. 

Step 1: Find sad index card box. I had mine, but I've seen them for a few pennies at thrift stores and yard sales. It doesn't matter what it looks like to start with, though I liked the tan color of mine.

Step 2: Clean it up as much as you can. This one had the sticker on the front (which was going to get covered up entirely, so I left it) and other strange substances from living in the garage for a little while. After some cleaner and GooGone, it looked better and was cleaner.

Step 3: Get your Mod Podge, paint brush, and fabric of choice. I like to get my Mod Podge here :
Mod Podge - Gloss - 16 oz
Create groovy crafts in a flash with this 3-in-1 glue sealer and finish! Quick-dries clear on decoupage collages and albums for a glossy polished look. Glues to a variety of surfaces.16 oz.


Step 4: Coat your surface with the Mod Podge.
Step 5: Apply fabric while Mod Podge is tacky. Use your finger to smooth out all the bubbles.

Step 6: Apply a second coat of Mod Podge to the entire covered area and let dry. I left mine overnight.
Step 7: While your recipe box is drying, make an index card for each meal option you like preparing for your family. I had things like spaghetti, homemade pizza, lasagna, cheeeseburgers, tuna salad, and fried pickles on my cards! :) Yes, EVERYTHING. Even scrambled eggs or cheese sandwiches. Make a card for everything! This way you can "get ideas" when the dreaded question is likely instead of staring hatefully at your cabinets. :)
Step 8: Put the ingredients for each on the front of the card.
Step 9: Put the recipe on the back of the card.
Step 10: Put cards in the box. I put mine in alphabetical order so that I could find a recipe fast, but you might just want them random so you can work from the front of the box back. It's up to you.
Step 11: Look at the ingredients on most of your cards and create a pantry needs list. This is the dry/canned/frozen goods that you have space and need to keep to make the majority of your items.
Step 12: Purchase dry/canned/frozen pantry needs items WHEN THEY ARE ON SALE or IN BULK. That way, you pay as little for them as possible and always have them on hand.
Step 13: Make dinner!
Visit thecsiproject.com

Wednesday, April 28, 2010

Studio Rehab


This is the oh so boring studio before. Not exactly a creative space. And yes, I cleaned out the clutter BEFORE taking the before shot. Sorry. Throw a ton of crap in there and you'll imagine EXACTLY what the desk looked like. And the corner was just BLAND!


And here is the after!!! It was a long, hard day of work, but it was TOTALLY worth it! I'll show you more of it in detail, as there were literally dozens of projects that went into this. But I wanted to get to show you the new spaces today. There is far more to come, as the cutting table and ironing area are next on the list. But I'll try to share as I go! Wanna know what projects you have to look forward to? Well.... a little sneak would be trim storage for pennies, custom shelving for a song, and upgrade your organization with magnets! :) But off to bed, as this is a very tired penguin!


Visit thecsiproject.com

Tuesday, April 27, 2010

Pirate Curtain

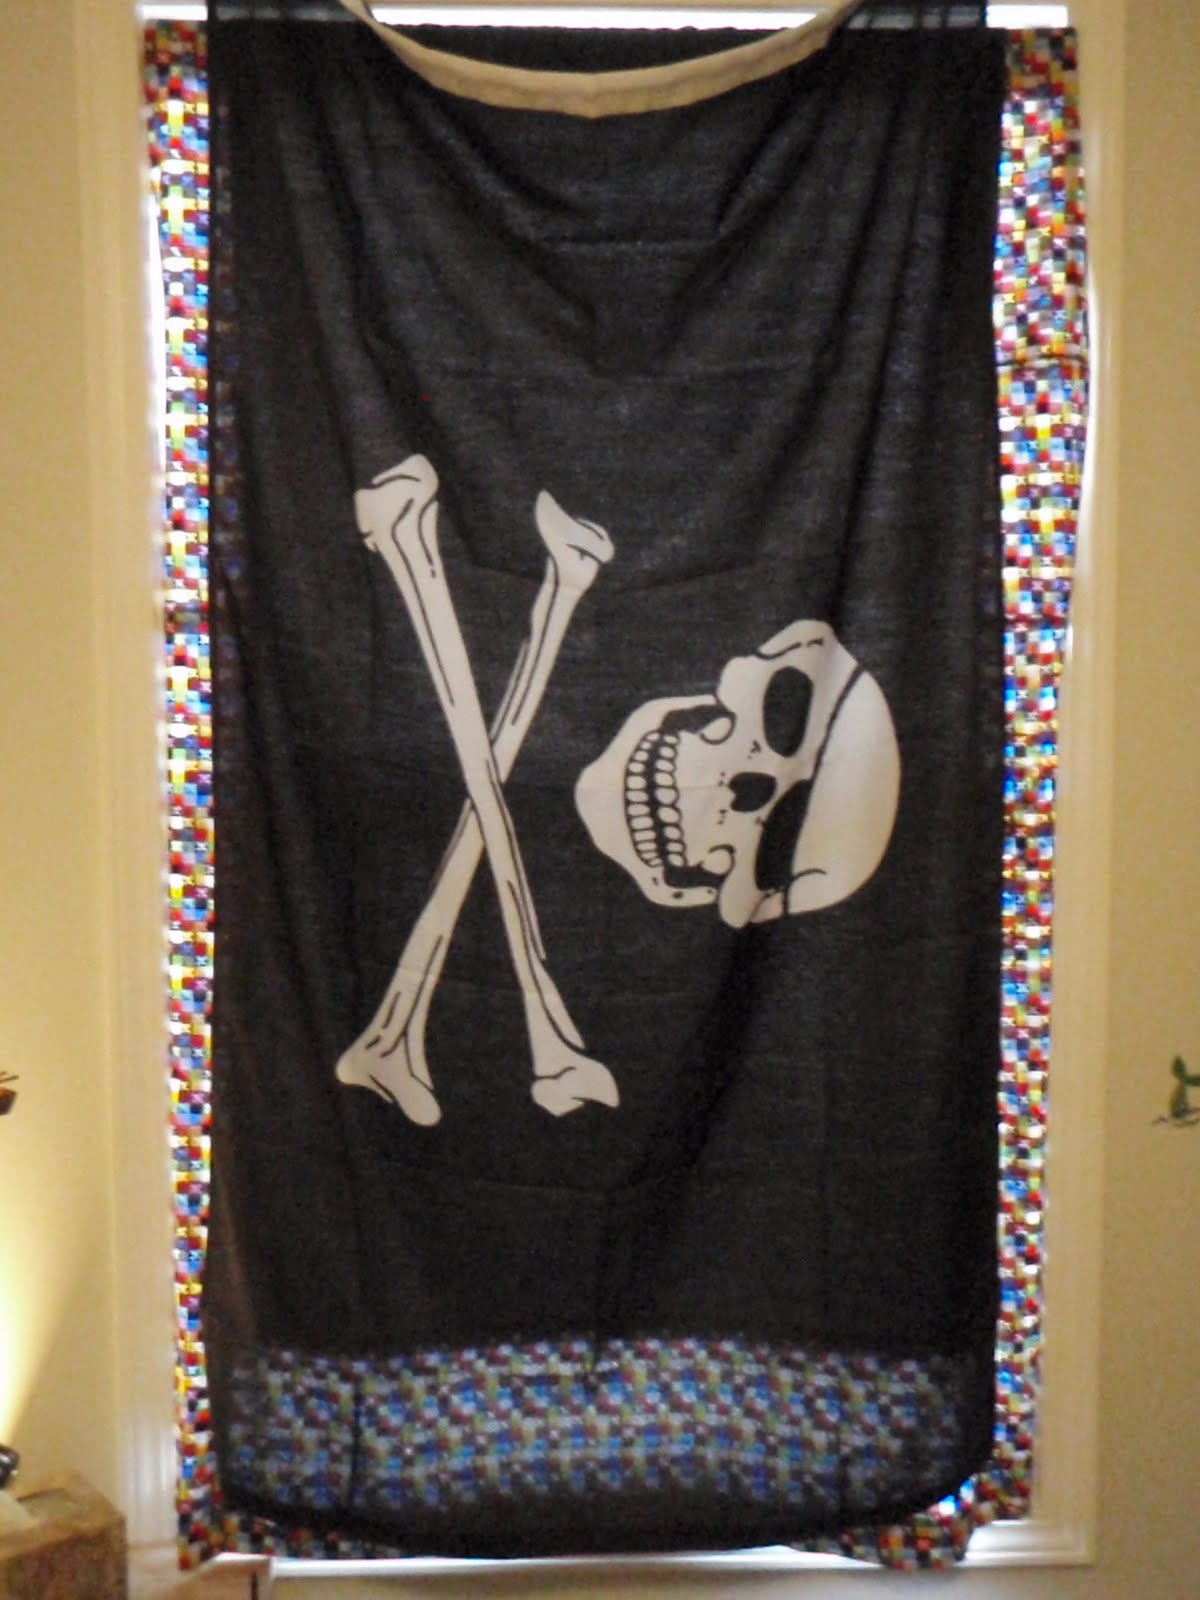
The Twins' bedroom needed a curtain. It had a piece of black fleece covering the window to keep out light. Not exactly swanky, but it did the job well enough. But to get with the pirate theme, I made them a curtain! It's got the black center panel and then colorful trim down both sides and the bottom. Right now, they have wide slat blinds behind it, which is working well. This window is one of the five on the front of our house, so I want them to look relatively cohesive from the outside. The master has two of the other windows in question, and it has the exact same matching wide slat blinds. Maybe that means I should put the wide slat blinds in my sewing studio, too? Though I have been doing more painting in there than sewing of late! :)


Anyway, back to the pirate curtain. So it has the middle black panel with the colorful pirate trim (color blocks with skull and crossbones in them!) that is also in the quilts I made for them. Then we hung their pirate flag over the black section (for now.... I don't like it as much now as when we did it earlier).

At the moment, it is hung rod pocket style, but I'm thinking about turning it into a roman shade instead. I love this tutorial over at Remodelaholic

* Remodelaholic: Gotta wear shades; Roman Shade Tutorial, Monthly Contributor


So, what do you think? Hate the flag? Think it needs to go roman? Think it needs a topper? I need some ideas! :)


Saturday, April 24, 2010

Big blog changes....

So I want to apologize to anyone trying to read for, oh... the last several hours. I've been determined to up the coolness factor of my blog, so I was playing template and format games. Unfortunately, I need to brush up my CSS and HTML, so I'm working on that. Let me know what you think. I've got to figure out a way to get my banner that Tara made me into this header space, but that can wait until tomorrow. I've got to share with you my fabulous fabric folder, but we've got horrible storms here that are killing the internet, satelite, ELECTRICITY. Maybe once they pass....

Friday, April 23, 2010

My new banner and logo!

You may have noticed my new banner at the top here.... and my fabulous new little penguin that is showing up on stuff. If so, please jump over to Graphic Designs By Tara to get one yourself! She's awesome, has amazing customer service, AND does pay it forward designs for free! You've got to check out her work. And no, she's not paying me in ANY way to say this. In fact, I gladly paid her for the WONDERFUL banner and logo she did for me and I can't wait to get more work done by her.  So go grab some of her fabulous work. You won't regret it!

Thursday, April 22, 2010

Pirate Growth Chart Tutorial: Hanging it!

To hang your lovely growth chart, begin by leaning it up next to the bit of wall you want to hang it on. Then yell for your husband to come hold it. When he comes to your aid, begin gesturing wildly at things while holding his drill. Then watch as husband shows you "proper respect" for said tool by drilling your pilot holes in the chart.
Make sure you do them on both sides, but I wanted to avoid putting them in the pretty stuff, so mine are offset.
Then measure up the wall to six inches. (Somehow, with all the help, this step didn't get photographed at all. Not even in bad light. Go figure.) Then make sure your 6 inch from the floor measurement matches up with your 6 inch measurement on your growth chart. At this point, since your holes are predrilled, attach it to the wall with screws. We use drywall screws with zipit drywall anchors in this house that can hold 25 pounds easily. Why? Because the man who often buys said screws and zipits says so. And since he's maning the drill for this part of the project, I do what he says. (We'll not talk about what I do in MY husband-less projects, okay?)
Attach your lovely growth chart, then marvel at how much you hate the screws. But we PLANNED for this! So plug in your glue gun, grab your initial letters, your pirate ship, and some gems, and lets get busy!
See? (okay, except for the flash-blinding part. I'm not a photographer, nor a photoshop expert yet. Anyone want to teach me?) Now the bling TOTALLY covers up the attachments! Rock on, hot glue! I did the same thing at the bottom, near the treasure chest (see, secret planning!)
(Okay, BAD picture. Sorry) And the pirate ship covers the ones in the middle!
Beautiful!

Whew.... I didn't think this project would ever get finished, but I'm SO glad it did! It looks lovely, has tons of color, and really looks great on the boys' walls. Right now, as you can see in the pictures, they have wall clings around the rest of the room. While the match the theme, they are the only other real DECORATION besides some cute pictures their Oma and Opa gave them. So on to more plans. Tomorrow is the day for a NEW CURTAIN! I'm sure you are just drooling with.... excitement. Not the Thursday at 10pm glazed look....right.

Tuesday, April 20, 2010

Pirate Growth Chart Tutorial: Finishing Touches

I love when you get to that point in a project where you can see the light at the end of the tunnel. Even better when you can tell it isn't a train! :) So here's the details on the details. Pardon the LOADS of pictures. It's hard to get good photos of a 6 foot board! :)
Begin by using your speed square to find the nice straight line of the bottom. Then use your ruler to start measuring up each inch from there. This is where you use a pencil. But write LIGHTLY, in case you do need to erase.Slowly work your way up the board, just marking the inches. I chose to put mine in the middle of the board so that the measurements of my boys could be on either edge. That was totally personal preference. Do what works for you.
Then you need to go back and count out your foot lines. See behind the X that marks the spot how there is a dark line? That's my foot marker. Also notice how it is NOT at the edge of the board. I know that I want to hang my board above my baseboards. This means I need to start my chart at something greater than 4 inches. I chose 6 because it made more sense to me. So I counted up 6 inches to my FIRST foot mark and made that 1. Make sense?
In places where the foot marks fell on an image, I ran the line like it was actually behind it, though it wasn't. I guess you could have done your measurements FIRST and then your decorations so that they would actually be ON TOP, but that's a personal preference too. You'll also notice from this picture how I added the numbers (freehand, though you could print out a font to copy) OVER the lines in red paint.Then I added the boat we made earlier in the week. Hot glue, baby, hot glue.And I transfered the measurements (along with dates) for the boys so far. I got these from the pediatrian's report cards. I LOVE our pediatrian! :)
Then I decided it needed more bling. So I used some glitter glue to make my bouty chest more "treasure" and less "paint". It also gave it an extra tactile thing for the boys to enjoy now while they are small and close to the floor.

At this point, we were all pretty done, so it was bed time. No hanging of the chart, as the boys prefer no drilling in their walls while they are sleeping. Party poopers. :) So tomorrow, we HANG IT, baby!

LinkWithin

Related Posts with Thumbnails